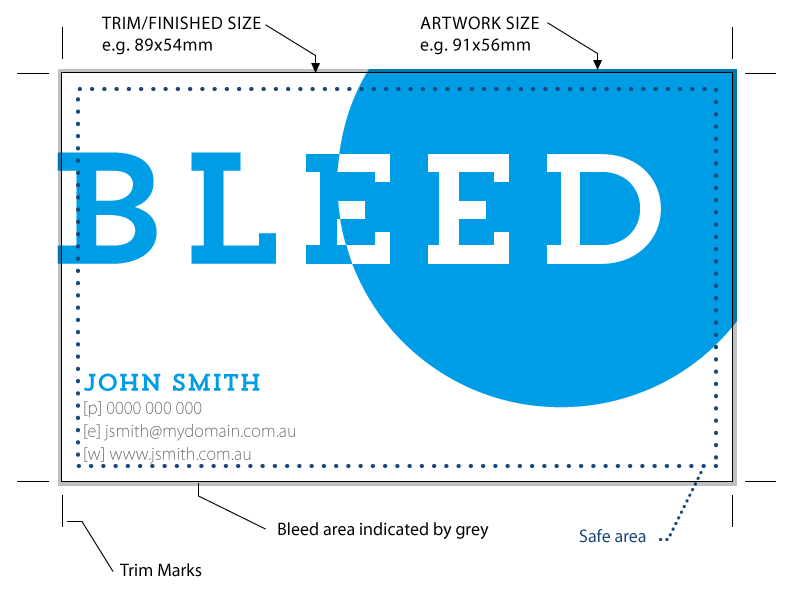
What is Bleed?
So what is bleed and why do I need it you ask, well bleed is a small area on the outside of the trim marks but before the edge of the printed material.
Why do I need bleed?
This bleed exists to prevent the possibility of a small white gap at the edge of the finished job where a design object is required to go all the way to the edge of the paper. As you can imagine if your artwork finishes at the trim marks then it need only be cut 0.1 – 0.2mm out and your design no long goes all the way to the edge. So any object that is to go all the way to the edge needs to extend past the trim marks by the designated bleed amount.
When do I need bleed and how much bleed should I have?
If a designer wants any element of their design to go all the way to the trim edge on the finished product then they should extend the object PAST the trim marks by the printers set bleed amount (see bleed diagram). This is typically 1mm for a non folded product like a business card, 3mm for a folded product like a brochure or booklet and 5mm for a book. These allowances exist to accommodate the physical printing processes which are beyond the scope of this post but needless to say if you don’t have them then you risk being very disappointed with your finished product.
What’s the Safe Area?
We recommend you keep all important information at least 2mm(for cards) or 3mm(for books/booklets) in from the trim edge, to avoid important information from being trimmed off.
What if I want a border on my job?
As per safe area we recommend not using borders less than 3mm. As they may appear uneven when trimmed.
Disclaimer: Print Domain offers this advice free of responsibility. It is the sole responsibility of the client to provide files to our specification, any error in provided files and resulting printing is the responsibility of the client.

